The most common issue here is a file won't RIP because the font isn't licensed for that purpose, is corrupt, or simply a crap font.
Here’s what we want to do - open the PDF in Acrobat, outline the text, and get the printer off your back.
In Acrobat X, the process of outlining text is reasonably straighforward. Adobe restored the ability to outline text without having to fuss around with watermarks or other workarounds. The trouble is finding the feature. It’s buried in the Flattener Preview window.
Before proceeding you need to realise the text will no longer be editable.
Follow the steps below to convert text to outlines in Adobe Acrobat X Pro:
- Open the PDF in Acrobat.
(You want to open the file in Acrobat, because Acrobat will display the type correctly, using fonts embedded in the file, even if the fonts are not installed on your computer.) - Click Tools and click Pages.
- Click Watermark and select Add Watermark.
The Add Watermark window opens. - Type a period (or any other character) in the Text text box.
- Drag the Opacity slider to 0%.
- Click OK
- Click Tools and click Print Production.
- If you don’t see the Print Production panel under Tools, do this:
- a. Click the View menu.
- b. Select Tools.
- c. Select Print Production.
- The Print Production panel opens under Tools.
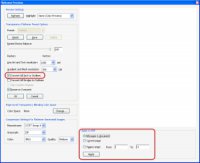
- Click Flattener Preview.
- Select the Convert All Text to Outlines check box.
- Select the pages you need to convert to text from the Apply to PDF group.
- Click OK to close the Flattener Preview window.
- Click File and select Save As to save your outlined text PDF as a different file from your original.